Learning
Step 1. Raw Material Preparation: The process begins with the metal pipe and outer plate
Key Inspection Points:
· Material Thickness
· Surface Smoothness
· Roundness (Dimensional Accuracy)
· Structural Integrity (No Deformation)
Competitive Practice:
Many manufacturers source pipes from external suppliers without rigorous inspection. This approach leads to high material waste and inconsistent product quality.
Our Advantage:
We maintain complete vertical integration by producing our own pipes. This allows for stringent in-house quality control, which enables us to:
· Identify and resolve issues immediately, preventing them from affecting final product quality.
· Ensure reliable on-time delivery by eliminating defects early in the process.
· Control costs effectively by minimizing waste and rework.
Step 2: Pipe Cutting
Key Consideration:
The cutting length is critical for minimizing material waste. The quality of the cut directly impacts both the final product quality and subsequent labor costs.
Common Practice (Other Factories):
They use standard, pre-cut pipes from the market. The fixed lengths often do not match the required dimensions, leading to significant material waste and loss of control over efficiency.
Our Advantage (In-House Production):
We customize the pipe length precisely according to our bottle designs. Since we produce and cut the pipes in a continuous, integrated process, we can achieve near-zero material waste at this stage.
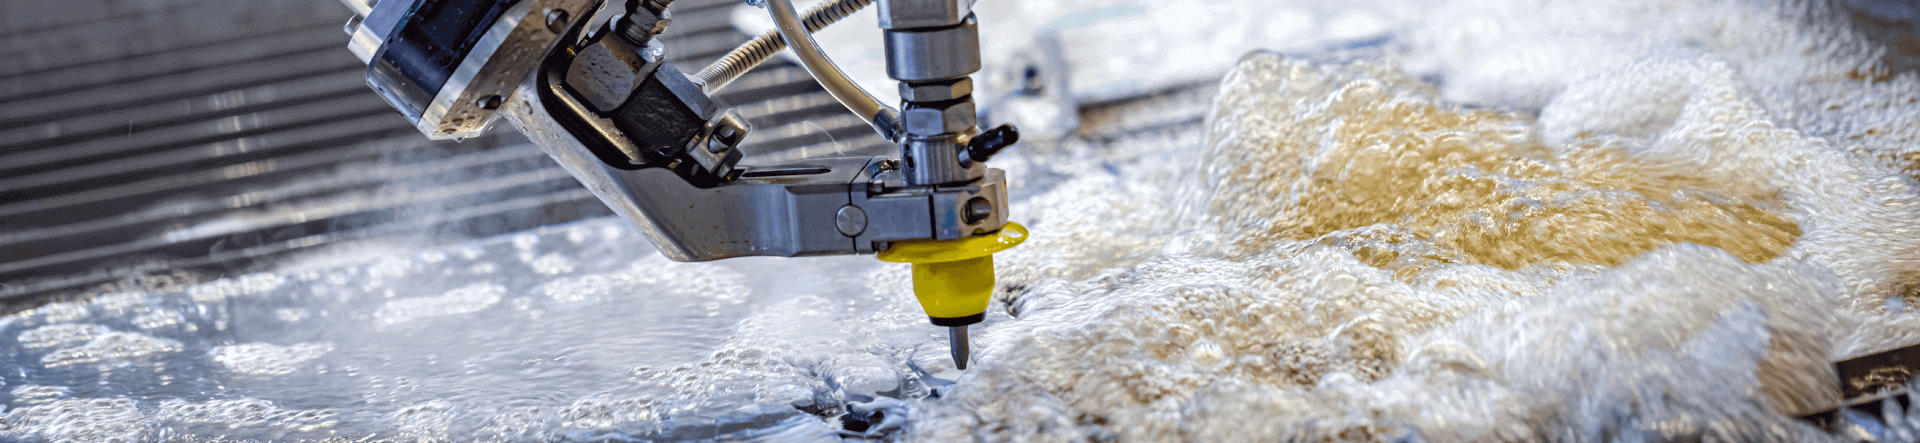
Step 3: Forming
We employ two primary metal forming techniques: Hydroforming and Stretching.
Method 1: Hydroforming (Water Swelling)
· Principle: A pipe section is used as the initial blank. Ultra-high-pressure liquid is injected into the pipe, forcing the material to expand and conform to the shape of the surrounding mold cavity.
· Application: This method is used to form both the outer shell and inner liner of our bottles.
· Process: A single hydroformed long pipe is precisely cut into two pieces, each serving as the blank for one bottle.
Method 2: Stretching
· Principle: This process forms the part directly from a metal sheet through mechanical pressing and stretching.
Identification Guide: How to distinguish the two methods?
· Hydroforming: Requires a welded seam on the initial pipe. Therefore, a vertical welded joint will be visible inside the bottle.
· Stretching: Formed from a single sheet of metal, resulting in a perfectly smooth inner wall with no welds.
Step 4: Metalworking
The inner liners and outer shells undergo a series of 8-10 precision processes, including incision, trimming, shaping, threading, and contouring. This phase is collectively referred to as metalworking.
Key Point: Dimensional consistency between the liner and shell is critical. Any mismatch can lead to assembly issues and increased waste. Therefore, rigorous spot-checking at key stages is essential to ensure perfect compatibility.
Traditional Factory:
· Requires 15-20 workers or operational steps.
· Production capacity: approximately 8,000 pieces per 10-hour shift.
· Quality tends to be inconsistent due to reliance on manual labor.
Our Advantage:
· Automated Production Line: Ensures consistent and repeatable quality.
· Dual-Quality Assurance: Each semi-finished part is automatically measured by the machine and then immediately verified by an operator.
· High Efficiency: Only 2 workers are needed to oversee a production output of 12,000 pieces within 24 hours, guaranteeing both superior quality and high throughput.
Step 5: Base Plate Stamping
Key Point: The dimensional accuracy of the base plate is critical for a seamless fit with the bottle body and for achieving a clean, aesthetically pleasing weld seam during assembly.
Common Practice (Other Factories):
Sourcing base plates from external suppliers often leads to inconsistencies in size and quality. This results in high rejection rates during welding, causing material waste and quality issues.
Our Advantage:
Our in-house automated stamping line guarantees precise plate dimensions, superior quality, and stable supply. This direct control minimizes welding defects, ensures consistent delivery, and optimizes overall costs.
Step 6: Injection Molding of Plastic Accessories
A stainless steel bottle is typically accompanied by various plastic components, such as inner/outer lids, stoppers, buttons, straws, nozzles, and silicone seals.
Common Practice (Other Factories):
These components are typically sourced from external suppliers, leading to limited control over quality and color consistency.
Our Advantage:
We operate our own injection molding lines. This vertical integration allows us to strictly control the quality of every part and precisely match colors to specific Pantone numbers, ensuring perfect accuracy and consistency across all orders.
Step 7: Copper Plating (Optional)
To enhance thermal insulation, some clients opt for a copper-plated inner liner. Under identical conditions, a copper-plated bottle will maintain a temperature 3-5°C higher than a standard bottle.
Key Quality Metric: A uniform coating with verified thickness is essential for optimal performance.
Our Advantage:
We have a long-standing strategic partnership with a specialized plating supplier. This ensures consistent, high-quality copper plating year-round. For clients with higher performance requirements, we offer this service to help build superior, brand-enhancing products.
Step 8: Welding
This is the process of permanently joining the inner liner and outer shell of the bottle.
Key Points: The weld seam must be fine, uniform, and completely airtight. The first preliminary temperature retention test is conducted at this stage.
Our Advantage:
We employ advanced laser welding technology across our entire production line. This ensures a consistently uniform and strong weld. Furthermore, we utilize computerized leak detection equipment to verify the airtight integrity of the inner chamber. This rigorous quality control significantly improves the sealing success rate and, as a result, enhances the final product's vacuum performance and thermal retention.
Step 9: Vacuum Insulation
After the inner liner and outer shell are assembled and welded, they are placed into automatic vacuum pumping equipment. This process extracts the air from the space between the walls to create a vacuum layer, which effectively prevents heat transfer, thereby providing thermal insulation.
Critical Parameter: The duration of the vacuum process is crucial. Insufficient time will result in incomplete air extraction, compromising the product's thermal retention capability.
Our Advantage:
We utilize state-of-the-art computerized vacuum machines that automatically control and guarantee the required processing time. Furthermore, we implement a rigorous 100% inspection policy for this step. Our acceptance quality standard is exceptionally high: a maximum of one failure per 100 units. If the failure rate exceeds this limit, the entire batch is subjected to a re-vacuuming process to ensure uniform quality.
Step 10: Precision Polishing
The quality of the polishing process directly determines the final product's aesthetic appeal and cost. Different grades of polish yield corresponding levels of delicacy.
Key Point: A 100% surface inspection is critical after polishing to identify any defects, such as dents or unpolished areas. This prevents wastage in subsequent processing stages.
Our Advantage:
We utilize state-of-the-art automatic polishing equipment. The mechanical polishing force is consistently uniform, ensuring stable and reliable product quality. Complementing this, we conduct a 100% inspection to guarantee that every piece meets our high standards before moving forward.
Step 11: Secondary Insulation Quality Check
This step is crucial to ensure that the polishing process has not compromised the vacuum seal, causing any air leakage.
Key Point: The operator at this station is responsible for performing a 100% leak inspection. Any bottle found to be unqualified is immediately removed from the production line.
Common Practice (Other Factories):
To reduce labor costs, this inspection step is often omitted. As a result, their overall vacuum sealing pass rate typically falls to around 97% or lower.
Our Advantage:
We strictly adhere to this secondary inspection, which is a key reason why we maintain a vacuum pass rate exceeding 99%, ensuring superior product reliability.
Step 12. Outer Base Installation
Some bottle designs feature the bottom of the outer shell as the final base. For others, an additional outer base component is attached to cover the shell’s bottom for a more finished appearance.
Key Point: Ensure the outer base is aligned correctly and attached securely without any tilting.
Step 13. Surface Finishing: Painting or Powder Coating
This process is now fully automated using advanced spraying lines. Operators simply load and unload the bottles from the conveyor.
Key Quality Criteria:
· Surface must be free of impurities, black spots, bubbles, or dirt marks.
· Paint/Powder coating must exhibit high adhesion (firmness).
· For double-coat applications, a contaminant-free environment is critical to prevent defects between layers.
Our Advantages:
· Automated Double-Coating Capability: Our equipment can automatically apply two uniform layers, ensuring a high-gloss, impurity-free finish.
· Advanced Technology: We use precision spray guns that apply coating evenly, resulting in superior adhesion.
· Rigorous Quality Control: We perform mandatory paint adhesion tests on every batch to guarantee durability.
· Versatile Finishes: We also offer UV painting and PVD coating options.
Step 14. Printing and Decoration
We offer multiple printing techniques, including screen printing, heat transfer, water transfer, air transfer, and 3D printing. We will recommend the most suitable method based on your design artwork and requirements.
Key Point: All prints must be accurately positioned, sized, and colored—with even coverage, high color fastness, and a clean finish free of smudges.
Our Advantages by Technology:
Step 15. Final Inspection & Packaging
Our Advantages:
Previous What does rPET stand for?
Once you give us a chance, we will have a team to service for you, including account executive,merchandiser,engineer,QA,QC.
Once you give us a chance, we will have a team to service for you, including account executive,merchandiser,engineer,QA,QC.
Once you give us a chance, we will have a team to service for you, including account executive,merchandiser,engineer,QA,QC.